SCP:CB - Modding Guide | WIP Topic

#1
Wikipedia wrote:A mod or modification is the alteration of the program code of a video game in order to make it operate in a manner different to its original version.
Modding SCP: Containment Breach is a simple task once you know how to approach it. Although multiple guides exist, this is a (as far as I can tell) complete guide on all the subjects that have been asked. If something is missing, please PM me and I will reply ASAP. Some examples of mods are the 'Box of Horrors' mod, a collaborative effort made by (at time of writing) InnocentSam and JuanJPro, and the 'Half-Life: Resonance Cascade' mod by CLgaming.

Please read all of this post before asking questions. You can follow the links below to go to various different topic subjects on modding. I encourage you all to post what you're working on, help will be provided and criticism also. However, if this thread is dead, please do not post in the thread for help, but instead PM me, or try contacting others who have created a mod and see if they can help.

Types of Modifications:
Compiling and Coding are hand-in-hand, coding is the process of changing the code, of which I will provide a rough outline on the Blitz syntax. (SCP:CB is coded in Blitz3D!) Compiling is using the modified source-code to create an actual program, a game that you can launch from windows normally. PREREQUISITES: Blitz3D

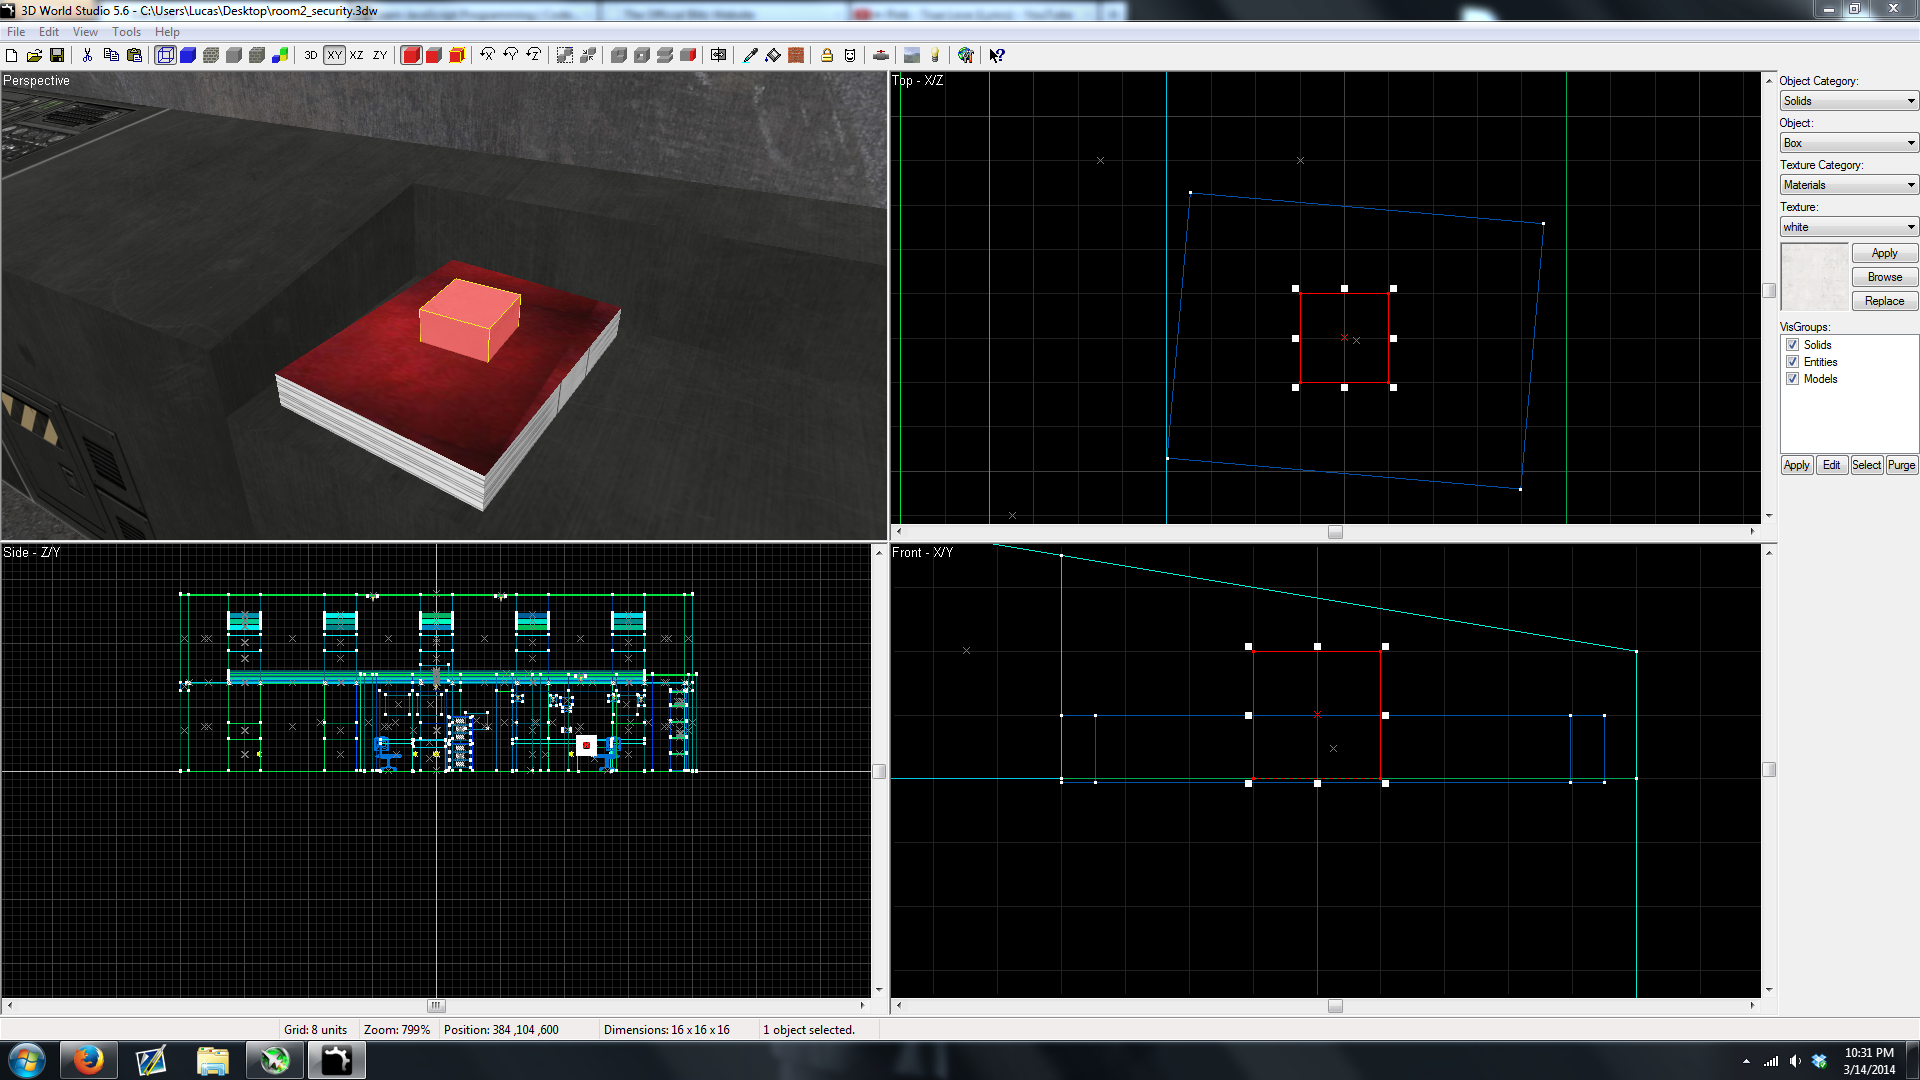
Mapping is the process of creating a room or modifying existing rooms intended for the player to explore in-game. Modifying rooms can add new geometry or events, anything more than a basic room will require compiling and coding to create. PREREQUISITES: 3Ds World Studio, Blitz3D (heavily recommended)

A resource pack is a mod where game files are changed, including models, textures, and sounds. they do not modify any source-code and are meant to work with the original program, meaning most resource packs will be compatible as long as they do not overwrite the same files.

Sections:
Compiling & Coding
Mapping & Room Events


Additional Guides & Resources:
Innocent Sam's Guide on Compiling
Innocent Sam's Guide on Adding Custom Items (Link Currently Broken)
Innocent Sam's Guide on Adding Custom Rooms

Mirocaine's Guide to adding Custom Models
Official Rooms for 3Ds World Studio (from 0.6.6) by Regalis
3D World Studio Chair and Computer Props by Regalis
SCP Label Template (.psd)]
Monitor Template(.psd)

Blitz3D User Manual
3D World Studio User's Guide

I'm always looking for additional resources, if you have anything you'd like to contribute be sure to post, or if there hasn't been a reply for a while please PM me!


Q & A:
Spoiler
Q: I followed your guide, and screwed up my computer!
A: You follow this guide under your own intent, any damage is caused by following this guide is your own doing.

Q: I get the error 'X'; and I cannot find a solution?
A: Post in the thread, I'll help to the best of my abilities.

Q: I get the error function BumpPower not found!
A: Blitz3D is not reading the FastExt.decl inside the USERLIBS directory, make sure it is located there.

Q: I get the error Stream does not exist.
A: Your source code cannot find the files to run the game, place the source code in the same place as the Containment Breach executable.

Q: I don't have a userlib directory!
A: Your Blitz3D installation is an older version, update to a more recent copy.

Q: I get an InitExt error!
A: Your FastExt.bb is malfunctioning, try replacing it and make sure it is in the same folder

Q: I get error User lib not found.
A: You do not have either FastExt.dll or FastText.dll with accompanied source code.

Q: How do I update my code in files other than Main.BB?
A: Main.bb loads the files in the same folder as it, so any changes you've made to the other files will be included in the compile, turning your code into a game.

Q: I get the error 'X'; and I cannot find a solution?
A: P̶o̶s̶t̶ ̶i̶n̶ ̶t̶h̶e̶ ̶t̶h̶r̶e̶a̶d̶,̶ ̶I̶'̶l̶l̶ ̶h̶e̶l̶p̶ ̶t̶o̶ ̶t̶h̶e̶ ̶b̶e̶s̶t̶ ̶o̶f̶ ̶m̶y̶ ̶a̶b̶i̶l̶i̶t̶i̶e̶s̶. Due to forum rules avoiding bumping, please read the introduction on how to receive help.

Q: What does 'compiling' mean?
A: It means turning the code into a Windows program, an Executable (.exe) file that Windows can run and understands.

Q: Is this guide illegal? Or against forum rules?
A: No, as it does not link to any warez related websites. The farthest it goes that direction is the second link in the first part, or this.

Q: I don't know where Blitz3D is installed, or I already installed it!
A: By default C:\Program Files\Blitz3D, or Program Files (x86) for 64-bit users. If you don't know what you are, look here.

Q: I don't have a Program Files (x86) folder!
A: You are not a 64-bit user then, use Program Files without (x86) instead.

Q: I can't find the program folder in Program Files!
A: If you have a Program Files (x86) folder, it will be in that folder by default. This means you run a 64-bit computer.

Q: I downloaded a template but I don't know how to open the .psd file!
A: .psd stands for 'Photo Shop Document'. You need Photoshop, or import the file into Gimp (free) using plug-ins.

Q: I don't understand half of this!
A: I have written this guide to be as simple as possible but technology is hard to explain for those less acquainted to the topic.
Update 2/2/2016
I am not going to update this guide since I have Windows 10, and unfortunately cannot use 3DWS. I may however write some of the coding tutorials if there is still a demand, this game is pretty dead tbh.
Last edited by mrpeanut188 on Wed Feb 03, 2016 5:47 am, edited 10 times in total.
Image

Re: SCP:CB - Modding Guide

#2
Compiling (Updated for 0.9.2+)
Spoiler
Compiling is when you turn the Source-Code files into an executable file Windows can run. In this case we are creating the SCP: Containment Breach game again, but with any modifications we have made.

Part 1: Acquiring Software & Installation
Blitz3D
Download the Blitz3D trial from here, or you can do this to 'aquire' it for free. However, it is not supported, recommended, or encouraged, only a present option. After downloading, run the installer. Before you rush the installer, take note of the installation directory, as you will need to navigate to this directory when installing the FastExt's .DECL plugin.

FastExt & FastText
You require both Fast libraries, the FastExt (Fast Extention) and the FastText to compile the source code. You can download both trial editions at the Fast Libraries website.

Save both to your hard-drive, and we will open the FastExt trial .zip first. Keep digging inside until you find a 'for_Blitz3D' directory, which you should open. Open the Decl folder, and copy the FastExt.decl file into
a 'USERLIBS' folder inside the Blitz3D installation directory. E.X. 'C:\Program Files (x86)\Blitz3D\userlibs'. Navigate back to the 'for_Blitz3D' directory, and open the 'Include' folder. Find FastExt.bb, and paste it into the source code folder for SCP:Containment Breach, or wherever you are keeping the game's source code.

Do the above procedure again on the FastText archive, instead of copying FastExt copy FastText, same directories.

Part 2: Preparing the Code
Everything concerning installation for Blitz3D is now completed. All that remains is the source code itself. For the
coding to correctly run, you need to place the source code in the same folder as the Containment Breach executable
file (The program file). You can either dump the contents of 'Source Code' in your Game folder (Unless you removed it!)
into the main folder.All the .BB files should be with Containment Breach.exe. If this is done, open Main.bb with the
BlitzIDE by double-clicking, then click on Program > Debug Compile from the menu bar at the top. If the game gives
an error, jot down anything you see associated with it, then check in the Q&A section.

If the program runs smoothly with no errors, then you are ready to code. A basic coding tutorial is coming soon, so be ready.
Coding: Basic
(In writing que)


Coding: Updating your mod to latest version (Being re-written, lacking detail atm!)
Due to me not being active for a few months and a few other reasons, I've decided to give you a BETTER solution on how to update your mod to the current version of SCP: Containment Breach. The concept is this: you find the differences between the vanilla* source-code from the same version as your mod, and the newest vanilla* source-code. What you need to do is compare each file in the old source code folder to the corresponding file in the new source-code folder. A good tool for this is WinMerge. Alternatively, you can use http://www.diffchecker.com. For WinMerge directly compare the two as text files. In WinMerge, paste the contents of the old file into the left column, the newer code on the right column. The differences will be highlighted, look for the key on the webpage for more info.

*Vanilla, for those not used to term, means 'Plain'. I am basically saying that you need an unedited, original, source-code from the game download.
Last edited by mrpeanut188 on Wed Aug 27, 2014 4:33 am, edited 10 times in total.
Image

Re: SCP:CB - Modding Guide

#3
Mapping: Rooms
(In Progress, not yet edited for clarity)
Spoiler
Part 1: Acquiring Software & Installation
3D World Studio
Take note, you CANNOT use a demo version of 3D World Studio, as it does not let you export your maps to any
formats besides .3dw, while we need to export to Blitz3D format (.b3d) so the game can load it. Purchase the software here.

To create a room mesh for the game, you need to import the game's graphical resources, namely textures and models. To begin importing the textures, we need to locate 3Ds World Studio's material folder. The default path for this folder is 'C:\Program Files (x86)\3D World Studio\Materials' directory. Inside of the materials folder, delete everything except for the sprites folder. Importing textures themselves are easy, copy all the .PNG and .JPG from the GFX/map folder into 3Ds World Studio's materials folder.

To import the models, check InnocentSam's thread.

Part 2: Layout
The room dimensions are expressed in 3D World Studio grid units, you can change grid size using the default hotkeys, the [ ] brackets. Each of the 3 side-views have their own grid size, when you change the grid size the grid on which the mouse is hovering over will be changed.
Standard dimensions:

Code: Select all

Corridor Height: 384 units
Corridor Width: 338 units
Stair Step Width: 46 units
Stair Step Height: 32 units

Player Head Height: approx. 600-615 units
Player Head Height (Crouched): approx. 340-355 units
*The player's head is always moving so an exact height for ingame purpose cannot be given.

Door Height: 320 units
Door Width: 192 units

A room consists of a floor, walls, and a ceiling. Load up an example room and take note of how it is created. You may notice sometimes when you go behind a brush, it disappears. This is because those faces you are viewing have been deleted to save GPU power.
Mapping: Gimmicks
In progress!
Gimmicks are special objects or entities that draw attention. Usually they are re-used pieces of level design that are for detail, including cameras, doors, and items. However, the game handles most of these within the code. Thit means this sub-section requires Blitz3D to edit and compile the source code.
Positioning Items Spawned in Code
Spoiler
A lot of things cannot be made in 3Ds World Studio, but instead must be spawned in using the game's code. Things like cameras, all items, npcs, and events (technically).
This is a two step process: Finding the coordinates and necessary information to spawn an item then coding in the spawn of it.
For an example, I want to spawn an item 'Cup of Tea' on top of a book. I create a brush in 3Ds World Studio, then scale it up slightly. I'll position the brush where I want it to be, right above the book where I expect the cup to be. The small little 'x' is the 'origin' of the object, or where the center is in 3D space. When you have an object selected, it's origin should highlight with the brush, and at the bottom of the screen you will see the coordinates of the original, along with the dimensions of the brush. In this example provided, the same as above, the origin would be 384, 104, 600. These all respond to XYZ coordinates in 3D space. Meaning,
X=384, Y=104, and Z=600. Please reread this if you need too, it's pretty confusing the first time but after you grasp the concept it should become much easier.

In my following room code, I have the following.

Code: Select all

			;Desk Drink
			it = CreateItem("cup", "cup", r\x+386.0*RoomScale, +104*RoomScale, r\z+599.0*RoomScale, 137, 139, 65)
			EntityParent(it\obj, r\obj) : it\name = "Cup of Tea"
The first line has ' ; ', meaning that the code is not executed, it is only a message for myself that I left to know where I am in the code. The third line is only for cup items, it is renaming the cup to 'Cup of Tea', so that it appears to be tea. The only line that matters is the second, the CreateItem() function.
Let's dive into Items.bb and look for the function. The function tell you what variable it is expecting, and should look like this:

Code: Select all

CreateItem.Items(name$, tempname$, x#, y#, z#, r%=0,g%=0,b%=0,a#=1.0)
It's as simple as plugging in variables, same as your math class that you hate. If we take a look back at the code...

Code: Select all

CreateItem("cup", "cup", r\x+386.0*RoomScale, +104*RoomScale, r\z+599.0*RoomScale, 137, 139, 65)
That line of code that I made in the room spawns item Cup, using coded name Cup, at x coord 386*RoomScale, at y coord 104*RoomScale, and z coord r\559*RoomScale, along with giving the cup a color of 137 red, 139 green, and 65 blue.
The last 3 numbers are taken from the drinks' ini file to give it to correct color for the tea drink. The important factors in this coding equation are XYZ coordinates, and the item name. You might ask why the XYZ coordinates are multiplied by RoomScale, it is because you shouldn't assume that the rooms will be the same scale. What if they were made bigger to fit the player? Or smaller? Some smart thinking could save you a lot of trouble down the road, Regalis thought of this and I am merely following his example. The other important variable, the item name, can be found in 'Items.bb', to find out what item you want to spawn.

If in doubt, almost every item in the game is spawned like this, you can make sure you did it right by checking the variable there.


Code Snippets:
Spawn Item

Code: Select all

CreateItem(name$, tempname$, x#, y#, z#, r%=0,g%=0,b%=0,a#=1.0)
Take the first two arguments (name$, tempname$) from items.bb. Then, place the XYZ values where you want to spawn, read above to find out how to find these coords. the rest of the arguments are the Red-Green-Blue & Alpha settings for drinks dispensed by SCP-294.

Spawn Door

Code: Select all

CreateDoor(lvl, x#, y#, z#, angle#, room.Rooms, dopen% = False,  big% = False, keycard% = False, code$="")
Lvl argument should be set to 'r\level' to set the room as the door's parent. XYZ coords are the same as other spawns. Angle should either be 0 or 90, vertical or horizontal when spawned into a room. Open and keycard are self explanatory. Big is whether is is a 'containment door', the giant metal ones like the one seen in the intro that they can't seem to close. Code is if instead of buttons it's a keypad.
NOTE: Buttons automatically place themselves with the door when it is spawned.

Code: Select all

PositionEntity(r\RoomDoors[0]\buttons[0], x#, y#, z#, global% = False)
As you can tell from the code, we named the CreateDoor() as RoomDoors[0]. Buttons are automatically named and are buttons[0] and buttons[1], as children of the door object.

*TODO: Rewrite this section so people can understand it
You now understand how to find 3D Coordinates and spawn items at that location, the next step is knowing where in the source to code it in.
Function FillRoom() is in MapSystem.bb, and it is called on each new room that is generated when you create a new save or load a map. It executes a different piece of code for each different room. If it does not have any code related to that room, it ends itself and the game continues creating the map. We need to associate code with the room, so add another 'case' to the list inside of the select. Scroll down until you see the 'End select' line. After the 'FreeEntity hallway' line, make another indent so that you are typing on the same line as the rest of the case lines, and write your case line with your room name. After this, you can indent and write any code featured in this guide. Have fun! (That is, if you can understand this before I rewrite.)


To be written...
Doors

Levers & Buttons
Cameras
Chatlog Monitors
Ladders?

Mapping: Events
To be written next!
Last edited by mrpeanut188 on Sat Sep 27, 2014 11:02 pm, edited 5 times in total.
Image

Re: SCP:CB - Modding Guide | WIP Topic

#4
I know this is yet another post, but this post ISN'T part of the guide. Instead, I'd like to kick off the WIP section of this thread with some progress of my own.

*Large images
Spoiler
Image
That is an early draft of SCP-096's containment chamber as seen from 3Ds World Studio. In the final version I am most likely going to delete a lot of the lights, as I already have 6 small lightmaps, I might just size them up and optimize the existing lights. The textures are mostly likely going to be replaced, mostly just the tile floor and the pillars with a metal floor texture.
Image
Yet another image from 096's chamber, this time is of the platforms. I have a basic platform modeled out. Next step is to create a pulley system used to pull the carts up and down.
The carts will be climbable, as the mod is using juanjpro's ladder entity as demonstrated in his 009 'Red Ice' mod.
Image

Re: SCP:CB - Modding Guide | WIP Topic

#5
mrpeanut188 wrote:I know this is yet another post, but this post ISN'T part of the guide. Instead, I'd like to kick off the WIP section of this thread with some progress of my own.

*Large images
Spoiler
Image
That is an early draft of SCP-096's containment chamber as seen from 3Ds World Studio. In the final version I am most likely going to delete a lot of the lights, as I already have 6 small lightmaps, I might just size them up and optimize the existing lights. The textures are mostly likely going to be replaced, mostly just the tile floor and the pillars with a metal floor texture.
Image
Yet another image from 096's chamber, this time is of the platforms. I have a basic platform modeled out. Next step is to create a pulley system used to pull the carts up and down.
The carts will be climbable, as the mod is using juanjpro's ladder entity as demonstrated in his 009 'Red Ice' mod.
This looks awesome! Will this room be part of the BOH mod when it's done?
Do you think NASA invented thunderstorms to cover up the sound of space battles?

Re: SCP:CB - Modding Guide | WIP Topic

#9
Akatos wrote:This looks awesome! Will this room be part of the BOH mod when it's done?
Currently it's being developed for the BoH and will not be a stand-alone modification.
Night wrote:Did you take my concept of the 096 containment chamber by any chance? :P
Looking good regardless, good job.
This has been bookmarked in Firefox since I've read it.
Serimah wrote:That looks really cool! Wish you had some more screenshots though. It looks oddly cramped from certain viewpoints but given the danger of 096 it makes sense I guess?
So, how are you planning to show any kind of damage done by 096? Like in the SCP-513 room? :)
Serimah wrote:That looks really cool! Wish you had some more screenshots though. It looks oddly cramped from certain viewpoints but given the danger of 096 it makes sense I guess?
The room as it is is pretty cramped, I'm already scaled it up twice, the 'containment cube' is 5 meters cubed (16.4ft). I've rounded it to ~16.5 feet cubed in-game.
Serimah wrote:So, how are you planning to show any kind of damage done by 096? Like in the SCP-513 room? :)
Yes, the 'containment cube' is in Blender and ready to be modeled. I have the 096 model in Blender, so I'm gonna pose him like he's gonna break out against the metal, and make a body imprint like the ones that Wile E. Coyote always makes.
From there on I'm going to 'rip' the metal outward and re-import into 3Ds World Studio as a mesh, and place it where the placeholder brush is.

If I have the time I'm going to provide rubble in the hallway and ceiling where 096 broke out the jumped a floor (presumably to the surface).
Kudos to Omniary and Juanjpro for helping me out. Due to the amazing work (and heisting skills) of Omniary, this addition will be a lot creepier!

More progress to come after some optimization!

[Edit]
I messed around with spotlights, they were in my original plan for the room but I just barely got them working. Final render would be much sharper.
Spoiler
Image
Image
Image

Re: SCP:CB - Modding Guide | WIP Topic

#10
Very useful topic!

Code: Select all

Corridor Height: 384 units
Corridor Width: 338 units
Stair Step Width: 46 units
Stair Step Height: 32 units

Player Head Height: approx. 600-615 units
Player Head Height (Crouched): approx. 340-355 units
I find this useful indeed. The dimensions of doorways is a noteworthy thing to add to this. I always have to copy-paste a doorway from a pre-existing map to save me some time.
SCP - Box of Horrors v0.8.0b
Twitter
Github Profile
cron